A chenille patch lives or dies by how it is attached. The looped yarn that gives a chenille letter its plush, three-dimensional look also makes it heavier and bulkier than a flat embroidered emblem, and that extra weight pulls at whatever is holding it to the garment. Choose the wrong backing and a patch that looked perfect on the sample can lift at a corner after a single wash. This walkthrough covers the backing options you can specify on a custom chenille order, what each one is genuinely good for, and how to write your choice into the order so the shop builds it the way you expect.
Why chenille asks more of its backing than a flat patch does
Chenille is built from looped yarn stitched onto a felt base, which makes the finished patch thick and comparatively heavy. A standard iron-on adhesive film is tuned for thin, flat patches; under a dense chenille letter it has more mass to hold and a less even surface to grip. That is why stitching is the standard finish on letterman and varsity jackets, where the patch has to survive years of wear, laundering, and the occasional tug. None of this makes iron-on useless on chenille. It means the fabric you are pressing onto, and the care you take applying it, matter more than they would with a small woven badge.
Iron-on and heat-seal: fast, fabric-fussy, easy to get wrong
Iron-on backing is a heat-activated adhesive film pressed onto the back of the patch at the factory. Applied well it is quick and needs no sewing. Set a dry iron to medium heat with the steam switched off, press firmly for 10 to 15 seconds, lift, and check the edges, pressing again if a corner is still loose. Then leave it completely alone until it has cooled. Skipping that cool-down is one of the most common reasons a patch peels within a week.
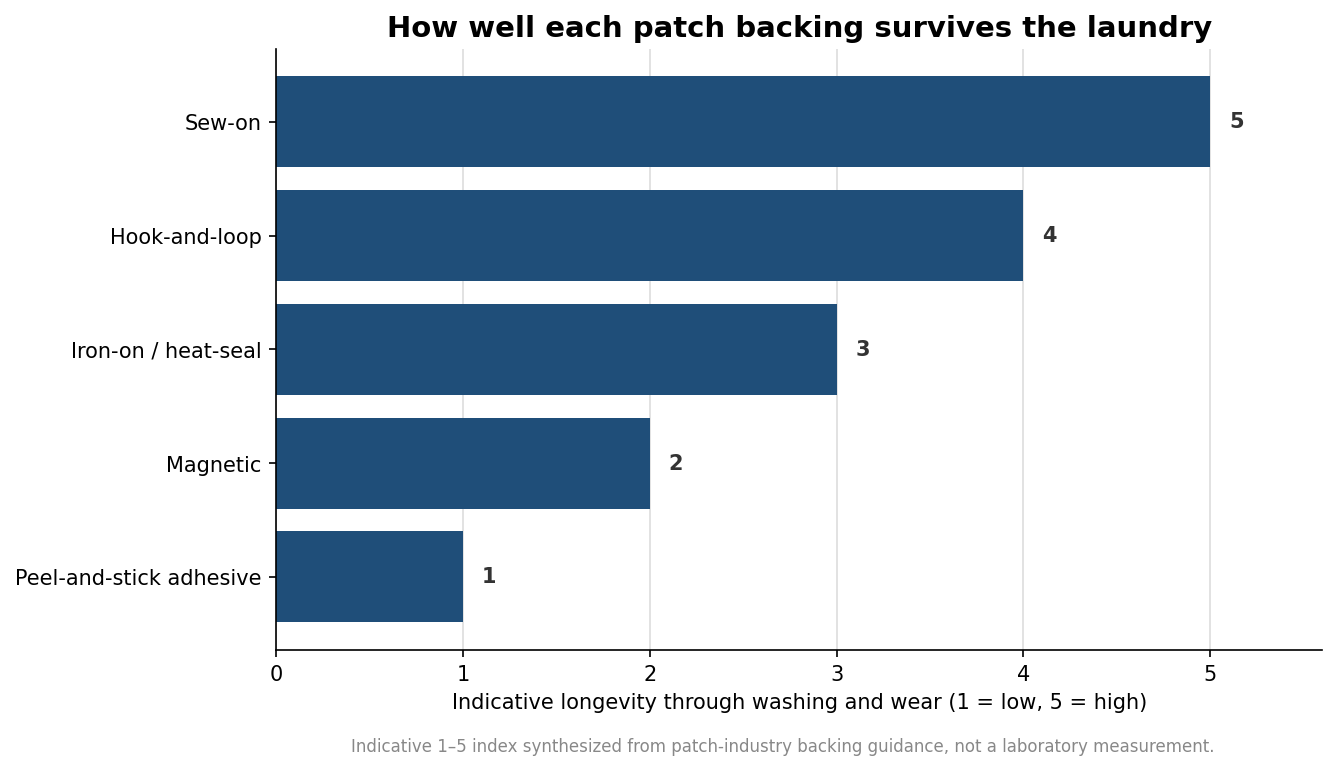
Fabric choice decides whether the bond holds at all. Cotton, denim, and heavier polyester blends take the sustained heat and bond well. Nylon and other heat-sensitive synthetics are a poor match, because the adhesive can scorch or melt the fabric before it grips. Treat iron-on chenille as a reasonable option for casual apparel and a risky one for anything washed often or worn hard, and know that many suppliers still recommend a few stitches around the edge as cheap insurance.
Sew-on: the default when the patch has to survive
Sew-on backing is exactly what it sounds like: the patch is stitched to the garment through its felt base. Thread does not loosen in the wash the way heat-set adhesive can, which is why sew-on is the standard on jackets, uniforms, backpacks, and workwear where durability matters more than speed. It works on almost any fabric, including the nylon and coated materials that defeat iron-on. Machine stitching around the border is fastest for a shop running volume, while hand-stitching gives more control on an odd-shaped placement. If you plan to sew, you can usually ask for a plain felt back or a merrowed, overlocked edge that gives the needle a clean border to pass through.
Hook-and-loop, adhesive, and magnetic: when removability is the point
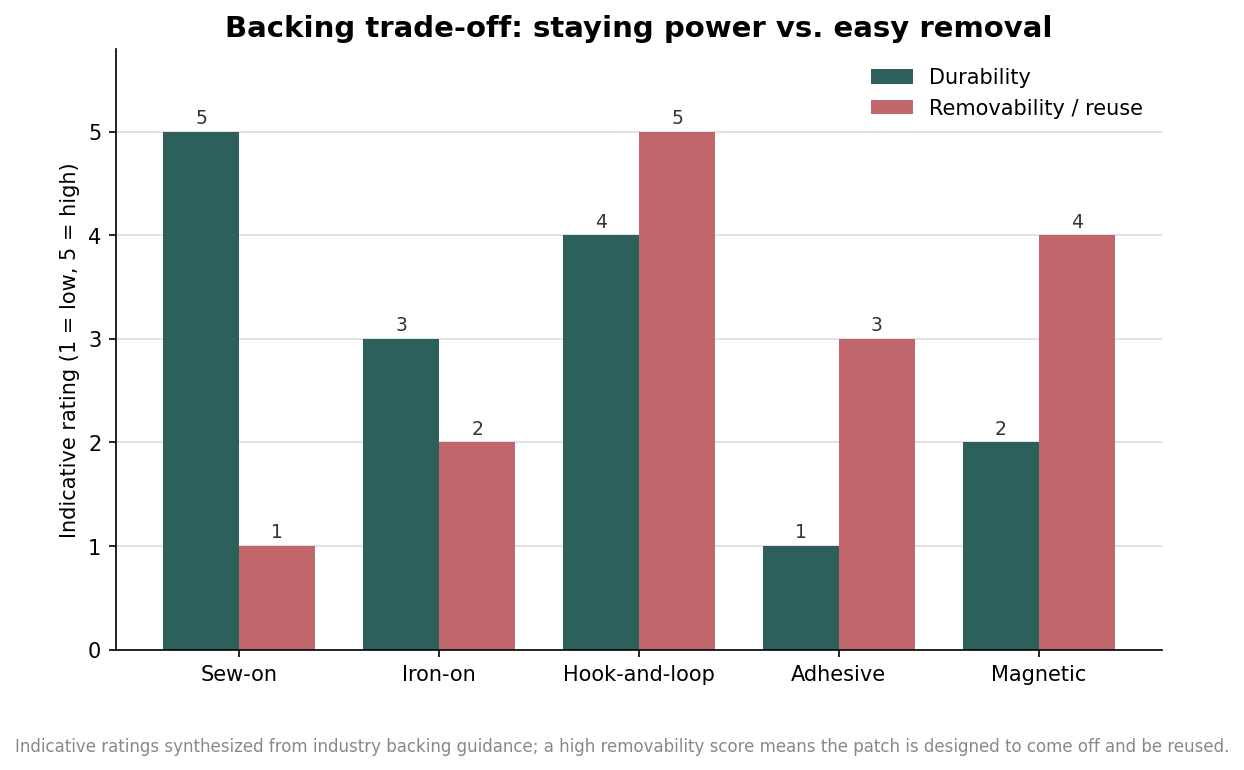
Not every patch is meant to stay in one place. Hook-and-loop backing puts the hook half of a Velcro-style pair on the patch and a matching loop panel on the garment or bag, so you can pull one patch off and swap another on in seconds. It suits tactical gear, morale patches, and any program where the same jacket carries different roles over time. The loop panel is a one-time addition to the garment; after that, any hook-backed patch of the right size fits it.
Peel-and-stick adhesive backing is genuinely temporary. It is fine for a trade-show badge, a one-day event, or a kids’ craft, but it will not survive repeated washing, heat, or friction, and on a heavy chenille patch it is the least reliable of all the options. Reinforce it with stitching if it needs to last past the afternoon. Magnetic backing is a niche pick for cases where you cannot pierce the garment, such as a uniform that does not allow pinholes; it holds a lighter patch to thin fabric with a magnet on the inside and makes little sense for a heavy letter on thick cloth.
How to write the backing into your order
When you place a custom chenille order, name the backing explicitly rather than leaving it to a default. State the attachment type, the garment it is going on, and how the finished item will be cleaned, because those three facts point to one clear answer more often than not. If the patches are for a team or a program, decide once and specify the same backing across the whole run so every jacket behaves the same way on awards night. It is also worth asking what edge finish comes with your chosen backing, since a merrowed border and a plain-cut border sew and wear differently.
Lead times and pricing generally track the rest of the order rather than the backing itself, though hook-and-loop adds the cost of the loop panel and sew-on can add a small charge if the shop applies the patches for you instead of shipping them loose. Ask for those figures up front so the quote you approve is the quote you pay. Whatever you choose, chenille lasts longest with gentle care: hand-wash in cold water and air-dry, keeping it out of the dryer and away from steam, since heat and agitation slowly wear down the soft yarn. A patch specified thoughtfully and cared for simply will still look sharp long after a rushed iron-on has started to curl.